Tuesday, April 23, 2013

A Nursery Armoire Before & After

Hello fellow readers and bloggers! Sorry for the hiatus.  After the completion of the Noah's ARC Design Challenge, which I first told you about here, I took a little break from blogging.  I had a super relaxing weekend and hope you did too!

But now its time to get on top of the remaining projects from Noah's ARC (not literally of course).  Today I'm going to share with you the deets on this beautiful before and after...


We started with this armoire we found at the warehouse...


It has some really beautiful details...


These lovely feminine curves are what dictated most of our other furniture choices.  (More on that here.)  But it also had quite a few large dings in it...


To cover up these blemishes and create a real fresh and clean look, we decided to go white.  (More about our painting plan here.)  So I patched up these nicks and dings with some wood filler, sanded them down, and then handed it off to Rachel took to it with the air compressor and spray gun full of Sherwin Williams "Westhighland White."

With it all painted white inside and out, it looked sparkly and new! But we wanted to give it a little something extra.  So I taped off the bottom insdie and painted the back by hand with SW "Colonial Revival Sea Green."  (Sorry for the poor picture quality; I was painting in the poorly-lit garage at night.)  


We also had two pieces of wood cut to create shelves. Initially we thought we'd have to create braces to hold them up, but as we began painting we noticed that it already had holes for dowels to hold up shelves.  The great thing about this is that whoever its new owner may be can adjust the shelves to their liking!  With  the shelves painted white, we popped them in.

To hang clothes, we cut down an old rake found at the warehouse and attached it with brackets from Home Depot.


Lastly, we taped off the lower inside door panels and painted them with chalkboard paint.  I love this last little touch!  Adorable and functional for your little child's budding creativity!


With the project complete, I styled the shelves with baby clothes, shoes, childrens' books and some storage bins beautified by Pavitra with decorative paper...


PS.  All final photos are taken with my new Canon Rebel t3i. Yay! :)

TDC Before and After

Wednesday, April 17, 2013

New Salvation Army Sofas!

I've still got more Noah's ARC projects to show you.  But for now, lets take a break.  I wanted to share that in the midst of the project, my new camera came! Yay!


So quite a few of the recent photos were taken with my new Rebel t3i... like 3 photos of our fabric covered suitcases, the final photos of the coral dresser, the completed mobile picture, and the final nursery photos in the stencil review post.  I'm still learning so many of these were taken on the automatic setting, but I'm slowly learning to use the manual settings effectively.  Like I said before, I'll be reading up on how to take better photos, so I'm hoping to improve. 

In other news, I also came up on two new sofas while working on the Noah's ARC Design Challenge!


I was busily putting the space together in the Salvation Army store one afternoon when I spotted this stylish white studded number calling my name.  Guess how much it was listed for... only $300! But wait!... the manager informed me that the next day everything in the store would be 50% off.  So I decided if it was still there the next morning, I'd snatch it up... and it was!  I knew the old one would look really shitty next to this nice new one (well not totally new, but certainly nicer), so I went on the hunt for something to go with it. I found this greenish-khaki-ish microfiber love seat in another Salvation Army store for only $88 on sale. Thats $238 for the pair.  Can you believe it?!?!

They're a HUGE improvement from my old ones.  Here's what the room looked like before...


Not a good photo since it was taken with my iPhone, but you get the idea. You also cant really tell that the sofas were not only outdated in style, but also quite scratched up and dingy. So I'm happy to have these new (well new to me) ones!  Not only do they look better, the also provide so much more room to stretch out since the arms are smaller and they're both much deeper.  Needless to say, after cursing under his breath while hauling the old ones out and the new ones in (up the stairs), Frank is particularly happy about these new additions.  And Duchess is too!


Now I'm in need of a new side table (or tables... not sure if I'll have one on the side by the tv stand or not yet).  And the room certain needs some styling.

I've also been thinking I want to bring some more color into the room to brighten and warm things up.  I'm still not sure what colors.  I'm kinda feelin' pink for some reason, but also have pale blue in the other room and love orange as well. Aaaand love this Cozamia print...


Hmmm... what do you think?

Tuesday, April 16, 2013

Crazy Awesome Paper Cranes!

Remember when you were in grade school and you envied the girl with the sticker collection the size of en encyclopedia?  And then in middle school that  crafty girl made awesome oragami that you tried your best to imitate?  Or am I the only one who got excited and maybe a little green (with envy) when a talented peer made something amazing?  Well get ready to envy now, because the Pavitra made us an awesome paper crane mobile for our Noah's ARC Nursery.  Here a little peak and her process...

I used colored photocopy paper because it is more sturdy than other paper to create the cranes.


Then, using two embroidery hoops (7” and 12’) and fishing line, I hung the cranes at various levels to get the look I wanted, longer in the center, and shorter around the edge.


I added ribbon around the embroidery hoops to give them a finished look.  And strung a few more strands of fishing line from the top to hang it.


Crazy awesome, right?!

Monday, April 15, 2013

Royal Design Studio Stencil Review

Good mornin' Morning! That's what Frank (my BF) told me you're supposed to say when you awake each day.  I don't know about you, but I think I definitely need that little bit of pep on Mondays.  So... now that we're pepped up, let's get down to business.

Our presentation and review for the Noah's ARC Design Challenge went really well on Saturday.  I think the  ASID judges we're really pleased with our design.  Not only did they look at the over all design and how well it came together, but they really paid attention to the details, which I think worked in our favor.

Today I'm going to tell you about a feature of our design, which the judges loved.  Our Royal Design Studio stenciled wall set an amazing backdrop to showcase all the fun projects I've been telling you about.


A stencil is a great way to get the look of wallpaper for a fraction of the cost (check out this post I wrote a while back).   It can add subtle interest to a room, or create a bold focal point if you go with a higher contrast of colors.  Another great advantage is that you can use whatever color paint your heart desires, making it easy to coordinate with your color scheme.  We also decided on stenciling the wall in order to distract from imperfections since the wall was unfinished sheet rock, exposed seams and all.  So if you have a wall with lots of imperfections, this could be the perfect way to cover it up!

The stencil we chose is the Get Ziggy With It Wall Stencil (large).


We also considered these options...

Herringbone Pattern Wall Stencil

Eight Pointed Star Moroccan Stencil

Moroccan Geometry Stencil

...but decided the simple chevron would work well with pretty much any fabric patterns we choose, which had not yet been determined.  And being that chevron is so in right now, it was perfect pattern to show the public a current design trend.

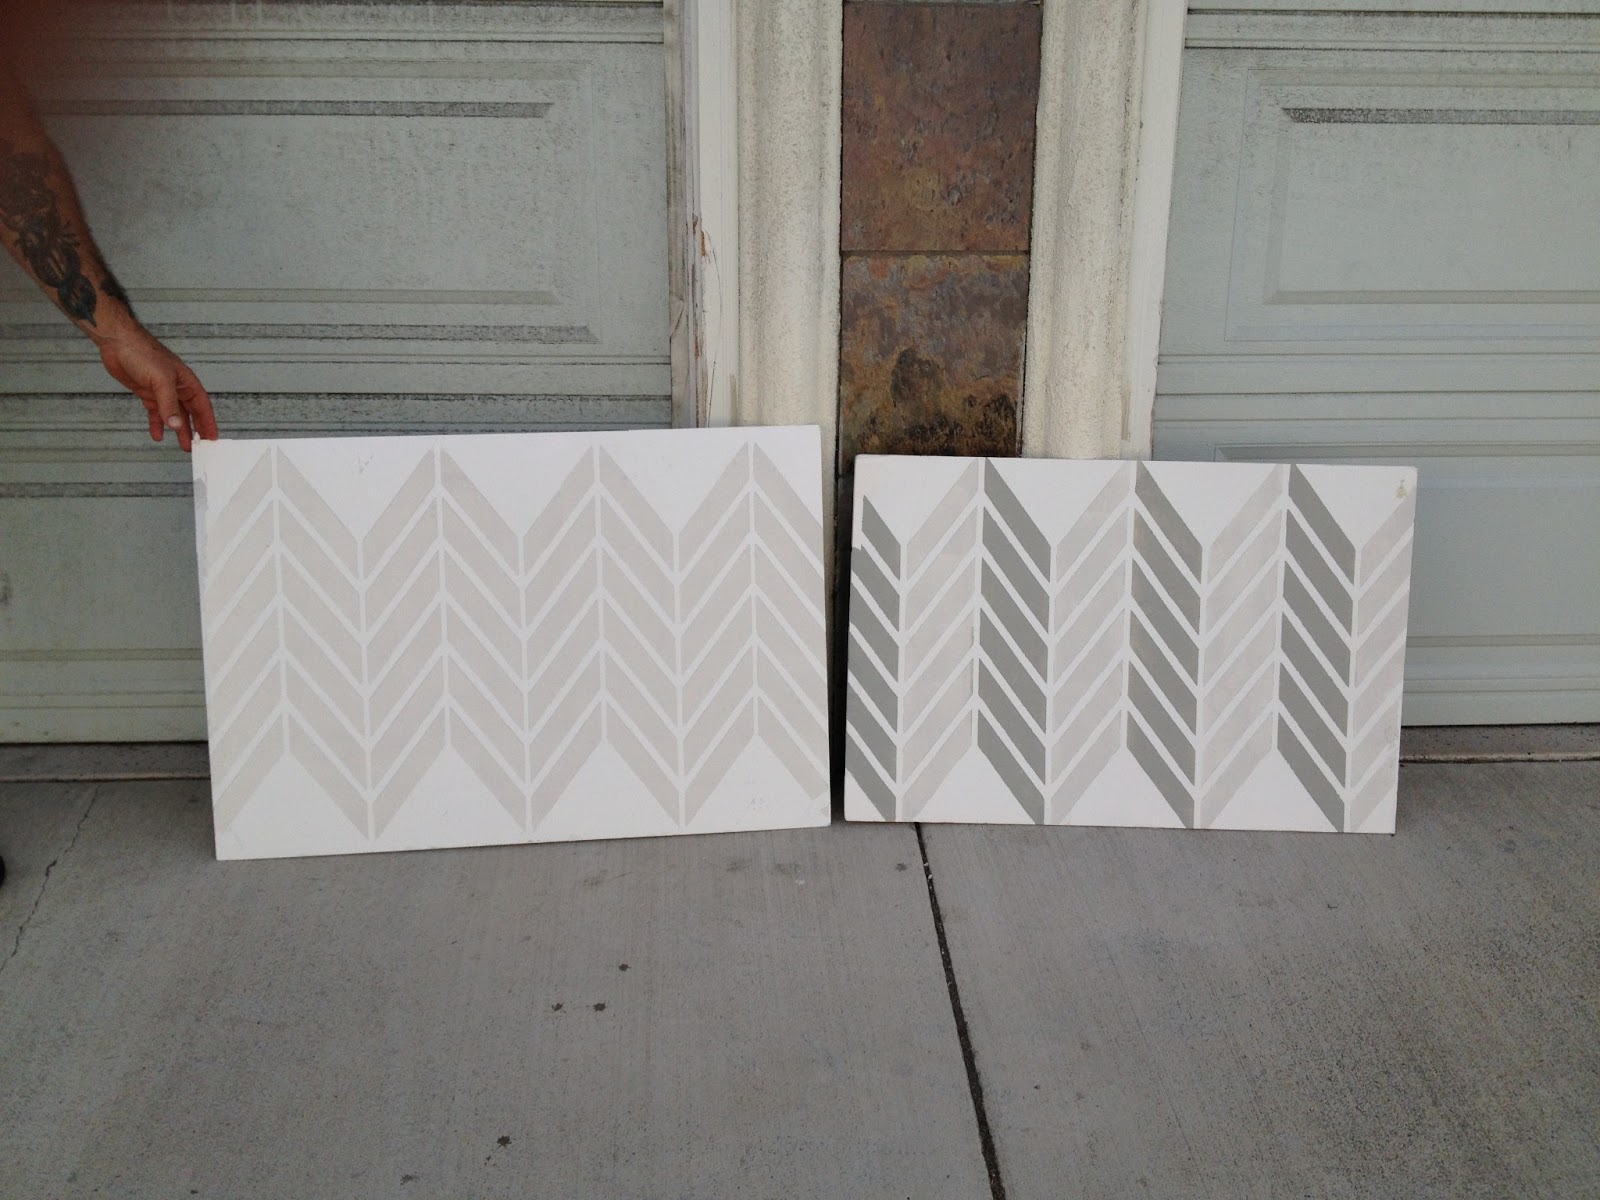
When I got the stencil, I decided to test it out on some cardboard.  That way we could make sure the whole group was happy with it and also bring the cardboard into the store so see what it would look like in the store's lighting.  We tried two different looks: one  with only a base color and a stencil color (left); the other like the photo on the Royal Design Studio website with a base color and two other colors (right).


Although the two tone stencil gives a really cool 3-dimensional look, we decided we liked the subtle tone-on-tone look better for this project. It would add interest and texture without competing with the gallery of painted-frames that would also hang on that wall.

So first we had to start with a white wall.  Rachel and I painted our vingette backdrop Sherwin Williams "Westhighland White" on Friday while it was still in the warehouse.  That way it would be ready to stencil right away on Monday once it was in the store.


On Monday morning I brought all our stenciling supplies to the site (the Huntington Beach Salvation Army).


That included a foam roller and plastic tray, blue painters tape to attach the stencil to the wall, small brushes to get into the corners, and Sherwin Williams "Crushed Ice."  I brought stencil brushes that I thought I might use to get into the corners, but didn't end up using those.  And the paint brush was actually used for the side walls, not the stenciled wall.

First I taped off the ceiling and floor.  Then, I started the stencil at the top center of the wall affixing it with painters tape.


And began painting away with the roller!


I found that the best technique was to roll most of the paint off in the tray so that I only had a light coat on the roller as I stenciled. That way it didn't bleed through.  I also went over the stencil twice in succession to get better coverage.  In the photo above you can see that on the first stencil (directly above where I have the stencil taped), I didn't do this and the grey didn't come out quite as dark as I would have liked.

I moved the stencil back and forth from side to side as the paint dried slowly covering the wall with the beautiful chevron pattern.  At the ceiling, I used the smaller ceiling stencil provided by Royal Design Studio, which leaves a nice straight finished edge at the top of the wall.  In the corners I pushed the stencil as far into the corner as I could, which didn't quite reach, but came pretty close.

Half way though  it was lookin' good!


As we were coming to an end, I used a small brush to hand paint the stencil all the way into the corners. I simply eyeballed an extension of the design, so there are some imperfections, but overall it isn't noticeable.

At the bottom, I first tried pushing the stencil down to the floor the same way I did in the corners.  You can see the result of this in the middle bottom of the photo below.  Then I tried using the ceiling stencil upside-down, which we liked better.  It came out absolutely lovely!


But I wanted to tell you... we ran into one other snag while stenciling.  The further along we got, the harder it was to match up the stencil with the completed surrounding pattern.  Because we knew there would be a dresser in the middle of the wall blocking some of the design, we made sure the stencil matched up best toward the sides of the wall where it would show.  As we got to the center, the stencil would have overlapped the previously painted stencil so, we simply put a piece of tape down over the previously stenciled area that wasn't matching up.  Unfortunately I don't have a picture of this so I did a little drawing to hopefully make more sense of what I'm saying.


Luckily with this pattern, that worked out perfectly and you can't even really tell that the pattern isn't perfect.

With the wall done, we painted the side walls the light gray and brought the furniture in place...


Some rearranging and the final touches of styling and the room looks absolutely amazing!


The stencil adds the perfect subtle interest to the focal wall and is a great backdrop for the punchy coral dresser and a gallery of painted frames.  Amazing right!?

There are still more projects I have yet to show you guys. So stay tuned for more info about the mobile, the armoire, side table, and more little details throughout the space.

Happy Monday!

Saturday, April 13, 2013

Judgement Day

This morning at 11:30 am, my Noah's ARC Design Challenge group and I will be presenting our "whimsical and chic" nursery design .  The judges from ASID's Orange County chapter will be judging our design against designs by 3 other schools (in different Orange County Salvation Army stores).  If you're in the OC area, come by and check them out from now until the 29th.

Here is the board I made to present our design...


I absolutely love the way the whole project has turned out and am so grateful to have had an awesome group to do it with.  Each team member pulled their weight and contributed creative design ideas and elbow grease.  Thanks ladies!

Wish us luck!

Friday, April 12, 2013

Need a little coral in your life? Or maybe on your dresser?

Sherwin Williams Charisma, painted furniture, dresser

I think I do! Now that this dresser is refinished and in place, I'm wanting something like it for myself.  Remember it before?


It's really a beautiful piece of furniture! But when we figured out our painting plan, we decided to give it a little "Charisma" for our Noah's ARC Design Challenge nursery space.

First, we brought all our booty from the warehouse visit to my house and took over the garage. I took off the hardware and we gave everything a coat of primer.


That was only a few moons ago on the 31st!  The next two weeks, Rachel spent many hours spraying this dresser (along with all the other furniture) with a little Sherwin... Sherwin Williams that is (remember the colors we chose back in March?).  And she did the job well!


Meanwhile, I attempted to polish the brass hardware with lemon juice and salt.  I read about this technique on Centsational Girl.


It seemed to be working at first, but I made the mistake of putting them back into the dirty lemon/salt solution in hopes that more soaking would help. Instead they just went back to black.  So I enlisted the help of my amazingly generous boyfriend to polish the hardware with Brasso, which really did the trick.


Thank's Frank!

On Tuesday we brought everything into the Huntington Beach Salvation Army to be set up.  Once in place, I screwed on the newly polished brass hardware, which was just the sparkle it needed.  It's like the perfect jewelry to dress up a flirty summer dress; fun and youthful, yet chic and classy.

brass pulls, sherwin williams charisma

Here's the before and after...
sherwin williams charisma, painted dresser, refinished dresser

I absolutely LOVE the way it turned out.  You're also getting a little peak of another awesome feature of the space that I'll tell you more about tomorrow.  :)

Speaking of tomorrow... tomorrow is opening day!  If you're local, our space and the 3 others will be up for viewing and bidding from the 13th to the 29th, so come check 'em out.  Here's some more info about locations and what not.  Hope to see you there!

TDC Before and After