Wednesday, November 28, 2012

Holiday DIY Projects - The Old

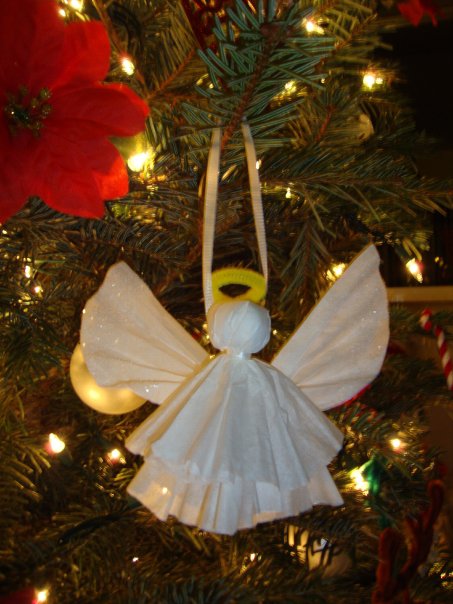
As promised, here are instructions for making these coffee filter angel ornaments.  I made these a few year back so I don't have photos of the process, but I pulled them out of storage to show you close ups of the back where the wings and halo are connected. Hope that helps!


Supplies: Coffee filters, cotton balls, yellow pipe cleaners, white ribbon, Elmers glue, glitter.

Step 1. Cover a few cotton balls with one coffee filter and tie a ribbon loosely around to create the head.  Leave the ribbon long enough to make into ornament.
Step 2. Take another filter and pinch it at the center. Tuck the pointed center into the "neck" to create the dress.
Step 3. Twist a pipe cleaner into a halo and insert it into the ribbon around the neck. Tighten ribbon.  Now you can tie the other end of the ribbon together so you have a loop to hang your angel.


Step 4. To make the wings, take one more filter, fold it in half once. The flat side will be the top of the wings and the round side will be the bottom.
Step 5. Fold the filter back and forth like a fan. Fold it in half at the center, and glue it to the back of the angel. 


Step 6.  To add a little sparkle, dab glue onto the edge of the wings and dust with glitter.
Step 7.  Hang on your tree, step back, and admire!


Tuesday, November 27, 2012

Holiday DIY Projects - The New

The new: Last night I rallied up a little Christmas spirit and made this framed "NOEL" sign out of a paper bag. Yep... a paper bag.  The old: A few years back, when I had my first real tree and a limited supply of ornaments, I made a bunch of coffee filter angels to hang on my tree.


My cousin asked me to show her how to create these so I thought I'd make the info available to anyone with a hankerin' to roll up their sleeves, get crafty, and Christmas things up. I plan to post more holiday DIY projects in the next few weeks. So... for today, the new "NOEL" sign; tomorrow, the old coffee filter angles, and later... check back for more!  Here ya go...

To create the NOEL sign all you'll need is a paper bag, pencil, scissors, painters tape, a straight edge, gold and silver spray paint, and a frame to put it in.


I spent a whole $0 to create this beauty by using what I already had. So if you're on a tight budget, I encourage you to do the same. Use a framed picture you have and just switch it out temporarily. Use any paint in whatever color you like. Acrylic, tempera, or spray paint would probably all work, although spray paint might be best because it dries quick and creates crisp lines.  I think if I used acrylic or tempera, I'd just use it without any water and maybe weight the paper down as its drying to avoid wrinkling.

Step 1. Cut paper bag to fit into frame. I simply traced the back insert for the frame and cut that out.
Step 2. Using your straight edge (I used the back insert for the frame) and pencil, lightly draw margins.
Step 3. Fold the page in half both ways to create four quarters (on for each letter).
Step 4. Using a measuring device (the thick roll of painters tape) mark the thickness of the letters. Then use your straight edge to draw each letter on its quarter of the page.  For example, I drew a mark a tape roll from the top left margin and the same distance from the bottom left margin and then used the straight edge to connect the two. This would become the left arm of the "N" and the left side of the "E". Don't worry about the mark going all the way through since you're going to cover it with paint.  To create the curves of the "O," I traced around a wide tea cup, and around a quarter for the inner line of the "O."


Step 5. Tape off the "N" and the "L" with painters tape. Make sure to cover up the "E" and "O" with another piece of paper bag.


Step 6. Spray paint the "N" and "L" gold (or your choice color) and let it dry before removing the tape.
Step 7. Tape off the "E" and "O" with painters tape. I reused a bunch of tape, which is why it is gold in the picture below. The center of the "O" was a bit tricky. I put a piece of tape down over the inner curve, then lifted the edges up to find my line and "traced" it onto the tape. Then I cut that piece out and used it as a template for the bottom inner curve... if that makes sense.  Again, make sure to cover up the "N" and "L" with another piece of paper bag.


Step 8. Spray paint the "E" and "O" silver  (or your choice color) and let it dry before removing the tape.
Step 9. Remove the tape and reveal your lovely "NOEL." Pop it back in the frame and put it somewhere for all to enjoy! :)

Wednesday, November 21, 2012

A Curtain Stenciling Adventure

My mom and I began stenciling curtain panels last weekend to create a custom look for less in her den. With Cutting Edge Stencil's Harlequin Trellis Allover Stencil, a pair of white LENDA curtain panels from Ikea, black acrylic paint, fabric medium, a couple dense foam rollers, and, don't forget, tunes to keep us goin', we went to work.


We mixed the acrylic paint with the fabric medium (2 to 1 ratio). As many other bloggers have said, and as it states on Cutting Edge's website, it seemed to work best to load up the roller with paint, then roller it onto a paper towel so that the roller is almost dry. I found that light pressure for the first few rolls would spread the paint around and avoid big blobs; as the roller got dryer I increased the pressure. It seemed that less paint and more pressure worked best.  After a test run on a piece of cardboard we taped down the curtain panel over a plastic tarp (some paint did go through so don't forget the tarp) and started stenciling away.


Unfortunately it was not as simple and graceful as many blogs make it out to be. I've never stenciled a wall, but my guess is that it would be much easier on a flat stationary surface. After the first row of repeats, it was hard to match up the stencil to the already painted areas above and to the side of it. If one side matched, the other would be off. To help it match up, I painted a little and kind of adjusted the fabric under the stencil as I went along so that it would meet the design in the correct spot.

Another issue we had was the surface underneath us. We decided to do it in my mom's kitchen, which is tiled, because it is the largest expanse of flat surface in her house (all elsewhere is carpet). The problem was that every time we tried to paint the panel directly above a grout line, it would leave a little blank spot where the surface dipped. We then would use a smaller foam "dabber" we called it, to try to fill in these holes, but often times, too much paint on the dabber would bleed through under the stencil. I think the most effective solution was not to put paint on the dabber at all and try to fill in with what paint was already on the fabric. I'm now thinking, that perhaps we should have left these imperfections and gone over them with a small brush once the stencil was removed.

With all that said. Here are a few progress photos.  The kitties were not happy about being stuck outside for 4 hours, but I think we gave them a sufficient amount of love and pets after we let them in.


One down, 3 to go.  We plan on doing one more exactly the same (with a bit of improvement in technique I hope) to flank the sliding glass door in the den, and two more panels with the same stencil using the wall paint for the closet so that it's less dramatic. I can't wait to show you the results of the makeover. It's really coming along!

We'll be continuing with the project this weekend after Thanksgiving.  Any suggestions from someone who's done this before?  Check back for the results next week!

Monday, November 19, 2012

Beach Christmas

With the holiday's approaching, more and more people have been pinning from my "Beach Christmas 2011" Pinterest board that I compiled last year as inspiration for my 2011 holiday decor.

beach Christmas decor decorations

Since it  was so popular, I though I'd share my 2011 holiday decor inspired by these pins.

Beach Christmas decor decorations


Beach Christmas decor decorations blue and green

Beach Christmas tree blue and green decor decorationsBeach Christmas ornaments decor decoration

This pretty shell and starfish garland was picked up by my hubby at a little tourist shop in Huntington Beach. I also got some of the blue and green ornaments (including what I call the "mermaid scales" ornament) and the little bead garland at, believe it or not, the 99cent store!

Then I hopped over to Joann's and picked up some burlap, which is pretty much the most inexpensive fabric there is (perfect for someone like me!), and some faux fur and made these stockings as well as the tree skirt.  And, for the whole effect, used pretty coordinating wrapping for the presents under the tree!

burlap and fur stockingsblue and green beach christmas

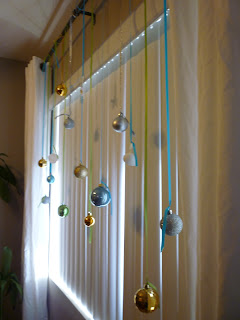
I also strung some bulb and shell ornaments on ribbon and hung them on my curtain rods to carry the color scheme throughout the room and add a bit of whimsy.

beach christmas decorwindow decor, beach christmas, christmas decorations

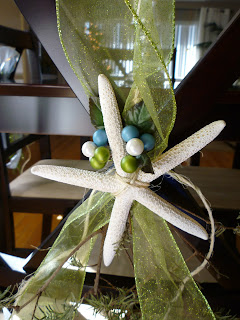
Finally, I brought the beach theme into the dining room with some starfish chair back decorations that I made by wrapping faux berries bought at Micheal's, a starfish, some ribbon and a sprig of Christmas tree with some twine and attaching them to each dining chair.  And for the fishing touches, don't forget the angel, poinsettia, and holiday treats!

beach christmas decor decorationbeach christmas decor decoration


beach christmas decor, blue and green christmas decorations

Hope you enjoyed!

This year I'm planning a white, gold, and silver Christmas with a fun little surprise. Do you have any fun holiday decor plans?

I linked up at Nesting Place. Check out the other fun decorations in blogland!

Thursday, November 15, 2012

Nightstand Before & After

Hey there! It's been a busy week and I have lots of items on my "things to blog about" list but haven't yet had the chance to get to them. I wanted to show you last year's Christmas decor inspired by my increasingly popular "Beach Christmas" Pinterest board, but I've been a bit bogged down so that will be coming soon. Here's a little preview.
beach Christmas decor

I had a space planning assignment due on Tuesday and we started our final, translating the "program" requirements for a real estate office to a complete space plan in only two three-hour classes... Eeek! The time limit makes it difficult to correct the little issues that arise when fitting so many functions into a small square footage. Of course my perfectionism wants to fix it all, but I'll just have to set that aside for the moment. I'm thinkin' I'm in pretty good shape though.

Prior to that... voted last Tuesday, and on Wednesday I participated in ASID (American Society of Interior Designers) Real World Design Week by spending the day with Cosentino, an international stone company with a multitude of beautiful surfaces that would jazz up any bathroom, kitchen, floor, or pretty much any other surface you or your designer dream up. We also hopped over to Fixtures Living in Costa Mesa to check out the sales side of their product and see other nifty design elements and appliances. I'll tell you more about that experience soon.

And on to the fun before & after...  I went over to Melissa's to help her restyle her bookshelves, hang art, and work on her nightstand, which I blogged about here. Check out the results! She also painted and recovered her cute little vanity chair.

DIY refinish nightstand recover stool

Whatdya think?  I think they came out fantastic! Great job Melissa!

Stay tuned for beach Christmas decor and more about Cosentino and their awesome products as well as a trip to the inspiring Fixtures Living store!


Monday, November 5, 2012

Melissa's Modern Enchanted Bedroom

So Melissa's little night stand project that I told you about last week is currently underway being transformed for her "modern enchanted bedroom." Melissa came to me with a desire for a bedroom with a bit of enchantment, a little modern funk, and a touch of vintage charm. She wanted to keep her existing furniture and bedding and incorporate grays and charcoals.  With Melissa's new artwork by Caia Koopman as inspiration, I developed these two mood boards as alternate options for her along with a floor plan for each. The first sticks to solid gray paint and curtains and brings in a little modern pattern with the IKEA rug. The second incorporates pattern West Elm curtain that Melissa liked and balances the pattern with a stenciled wall on the opposite side of the room.  In both designs, glass lamps add a little bit of sparkle and pillows and flower arrangements pick up the rosey tones in her art.

gray blue and red bedroom
space plan

Sources
1. Gray paint for the wall opposite the window to mirror the gray curtains. I figured we'd pick a color after she bought the drapes, but here is a good post by Emily Henderson on some nice grays.
2.  I gave her two options for curtains with different price points. The first are the waterfall ruffle curtains from Urban Outfitters. The second option is by Nate Berkus at Target.
I've also included the Threshold Knob Drapery Rod in Brushed Nickel from Target.
3. Read more about the plan for the craigslist nightstand here.
4. Vintage glass lamps found on Etsy add vintage charm and a little glamour.
5.  To add a bit of enchantment, the UNG DRILL mirror from Ikea will be placed across from the window to reflect light and brighten the space.
6. The rose design of the Etsy pillow echos the design in Melissa's art and brings out its color.
7.  The GISLEV rug from Ikea distributes color throughout the room, anchors the bed and adds a fun modern pattern for interest.
8.  In order to stay within Melissa's budget, I've plan for a DIY headboard made with plywood, egg crate mattress toppers, and a gray curtain panel.

grey white blue with rose accents bedroomspace plan


Sources
1. To simulate wallpaper, a stenciled wall using Cutting Edge Stencil's Entwined Allover Stencil balances the pattern of the curtains.
2.  West Elm Scribble Lattice curtains add a fun modern feel. (With this much pattern I left out the rug).
3. Same as above.
4. Same as above. I've also shown a gray lampshade as an idea for a possible DIY project.
5.  Same as above.
6. The rose design of the Arianne Pillow from Joss&Main echos the design in Melissa's art.
7.  Cute Oriental Decorative Cats from Etsy coordinate with some of Melissa's existing decor and add a personal touch to bookshelves.
8.  Same as above.

Melissa loves the Ikea rug and has decided to go with the first design alternative. Next step, I'll help her with a little organization.  I hope to report back with some before and after photos when it's all pulled together.