Well... that thing started out as this:
(Is it just me or does the dust bother you too?)
After searching and searching for a TV console that would fit the space, I realized I was going to have to buy an old piece of furniture and perform a little magic on it to get what I was looking for. I couldn't find anything in my measly price range that wide enough to fill the expanse of wall the way I wanted. So the DIY project began with a hunt for the right piece of furniture. I was excited when I found this little guy for $70 at Goodwill because not only was it wide enough, it also had the perfect spot for the dvd player inside the two doors. Believe it or not, I actually don't have cable! So no there's no cable box now, but there's room for one in the future if I ever get up to speed and join the masses in front of the boob tube. Anyway... I took it home and went to work!
After that, I borrowed an orbital sander from a carpenter friend and sanded the crap out of it! Carpenter friend also had some nifty little rubber tools similar to these for sanding around the trim, which helped tremendously. (I don't have any photos of this part... my apologies.) All of that took up the better part of my Saturday, so it was time for a break.
Sunday morning... back to work! I primed the whole thing with a few coats of RustOleum Primer. Once that was dry, I layered on a few coats of Semi-Gloss White, sanding lightly between coats. I made sure to paint the inside of the bottom two slots since this would be left open for the dvd player and other tv gadgets. Thanks to the many example's on the internet, I made sure to buy a spray paint handle to do all of this. I'm pretty sure I would have lost a finger had I not.
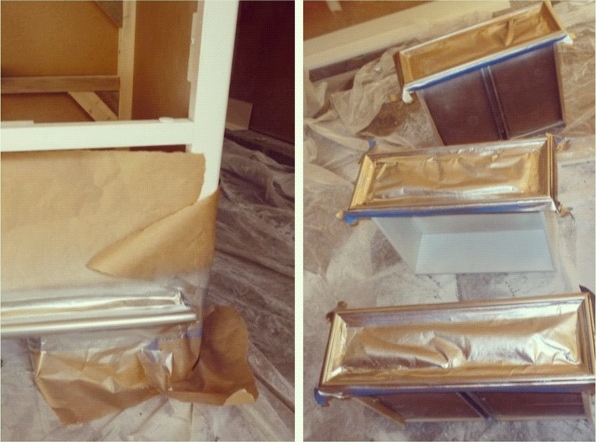
Next I taped off the trim with blue painters tape and paper and spray painted it Metallic Finish Silver to give this ho-hum piece of furniture a bit of sparkle and class.
For the media shelves I bought the cheapest wood I could find, had it cut to size at Home Depot, and spray painted it white. For a while I left the shelves sitting in their place without fastening them down in anyway because I forgot to buy trim to finish of the front edges and wanted to make sure it would fit flush with the front of the piece As you can see below, the wood had a lot of ugly texture, which I eventually covered up with some white contact paper that I had.
I finished the whole thing of with some Minwax Wipe On Poly for to give the whole thing a fresh shine and the hard part was done.
After a weekend of hard work, we (and by we I mean Frank and a friend that is a mover... thanks guys!) brought the new entertainment console upstairs and it sat in the living room without hardware for the next few months. (This is pretty much how most projects go for me as a busy/poor student).
And there ya have it!


love this gen! we're getting a few pieces of old furniture from jake's grandma and i totally want to make them look like this...maybe you can come help ;)
ReplyDeleteThanks! I'd love to help. We're long over due for some hang out time.
DeleteLooks pretty nice, love the silver!
ReplyDeleteGood job;)
looks great! i so want to redo something like this, so this is great inspiration!
ReplyDeleteThanks! It was a fun project. It's always so rewarding to get your hands dirty and make something you're own. Good luck with future projects! I'd love to see what you do!
Delete